
Steel Purlin & Bracing Material Selection: C/Z Purlins, Tie Rods & Struts for Roof Systems
C-section vs. Z-section purlins, tie rods, struts, and material grades for warehouse and industrial roof systems. Understand section properties, zinc coating classes, and load matching for secondary steel framing.
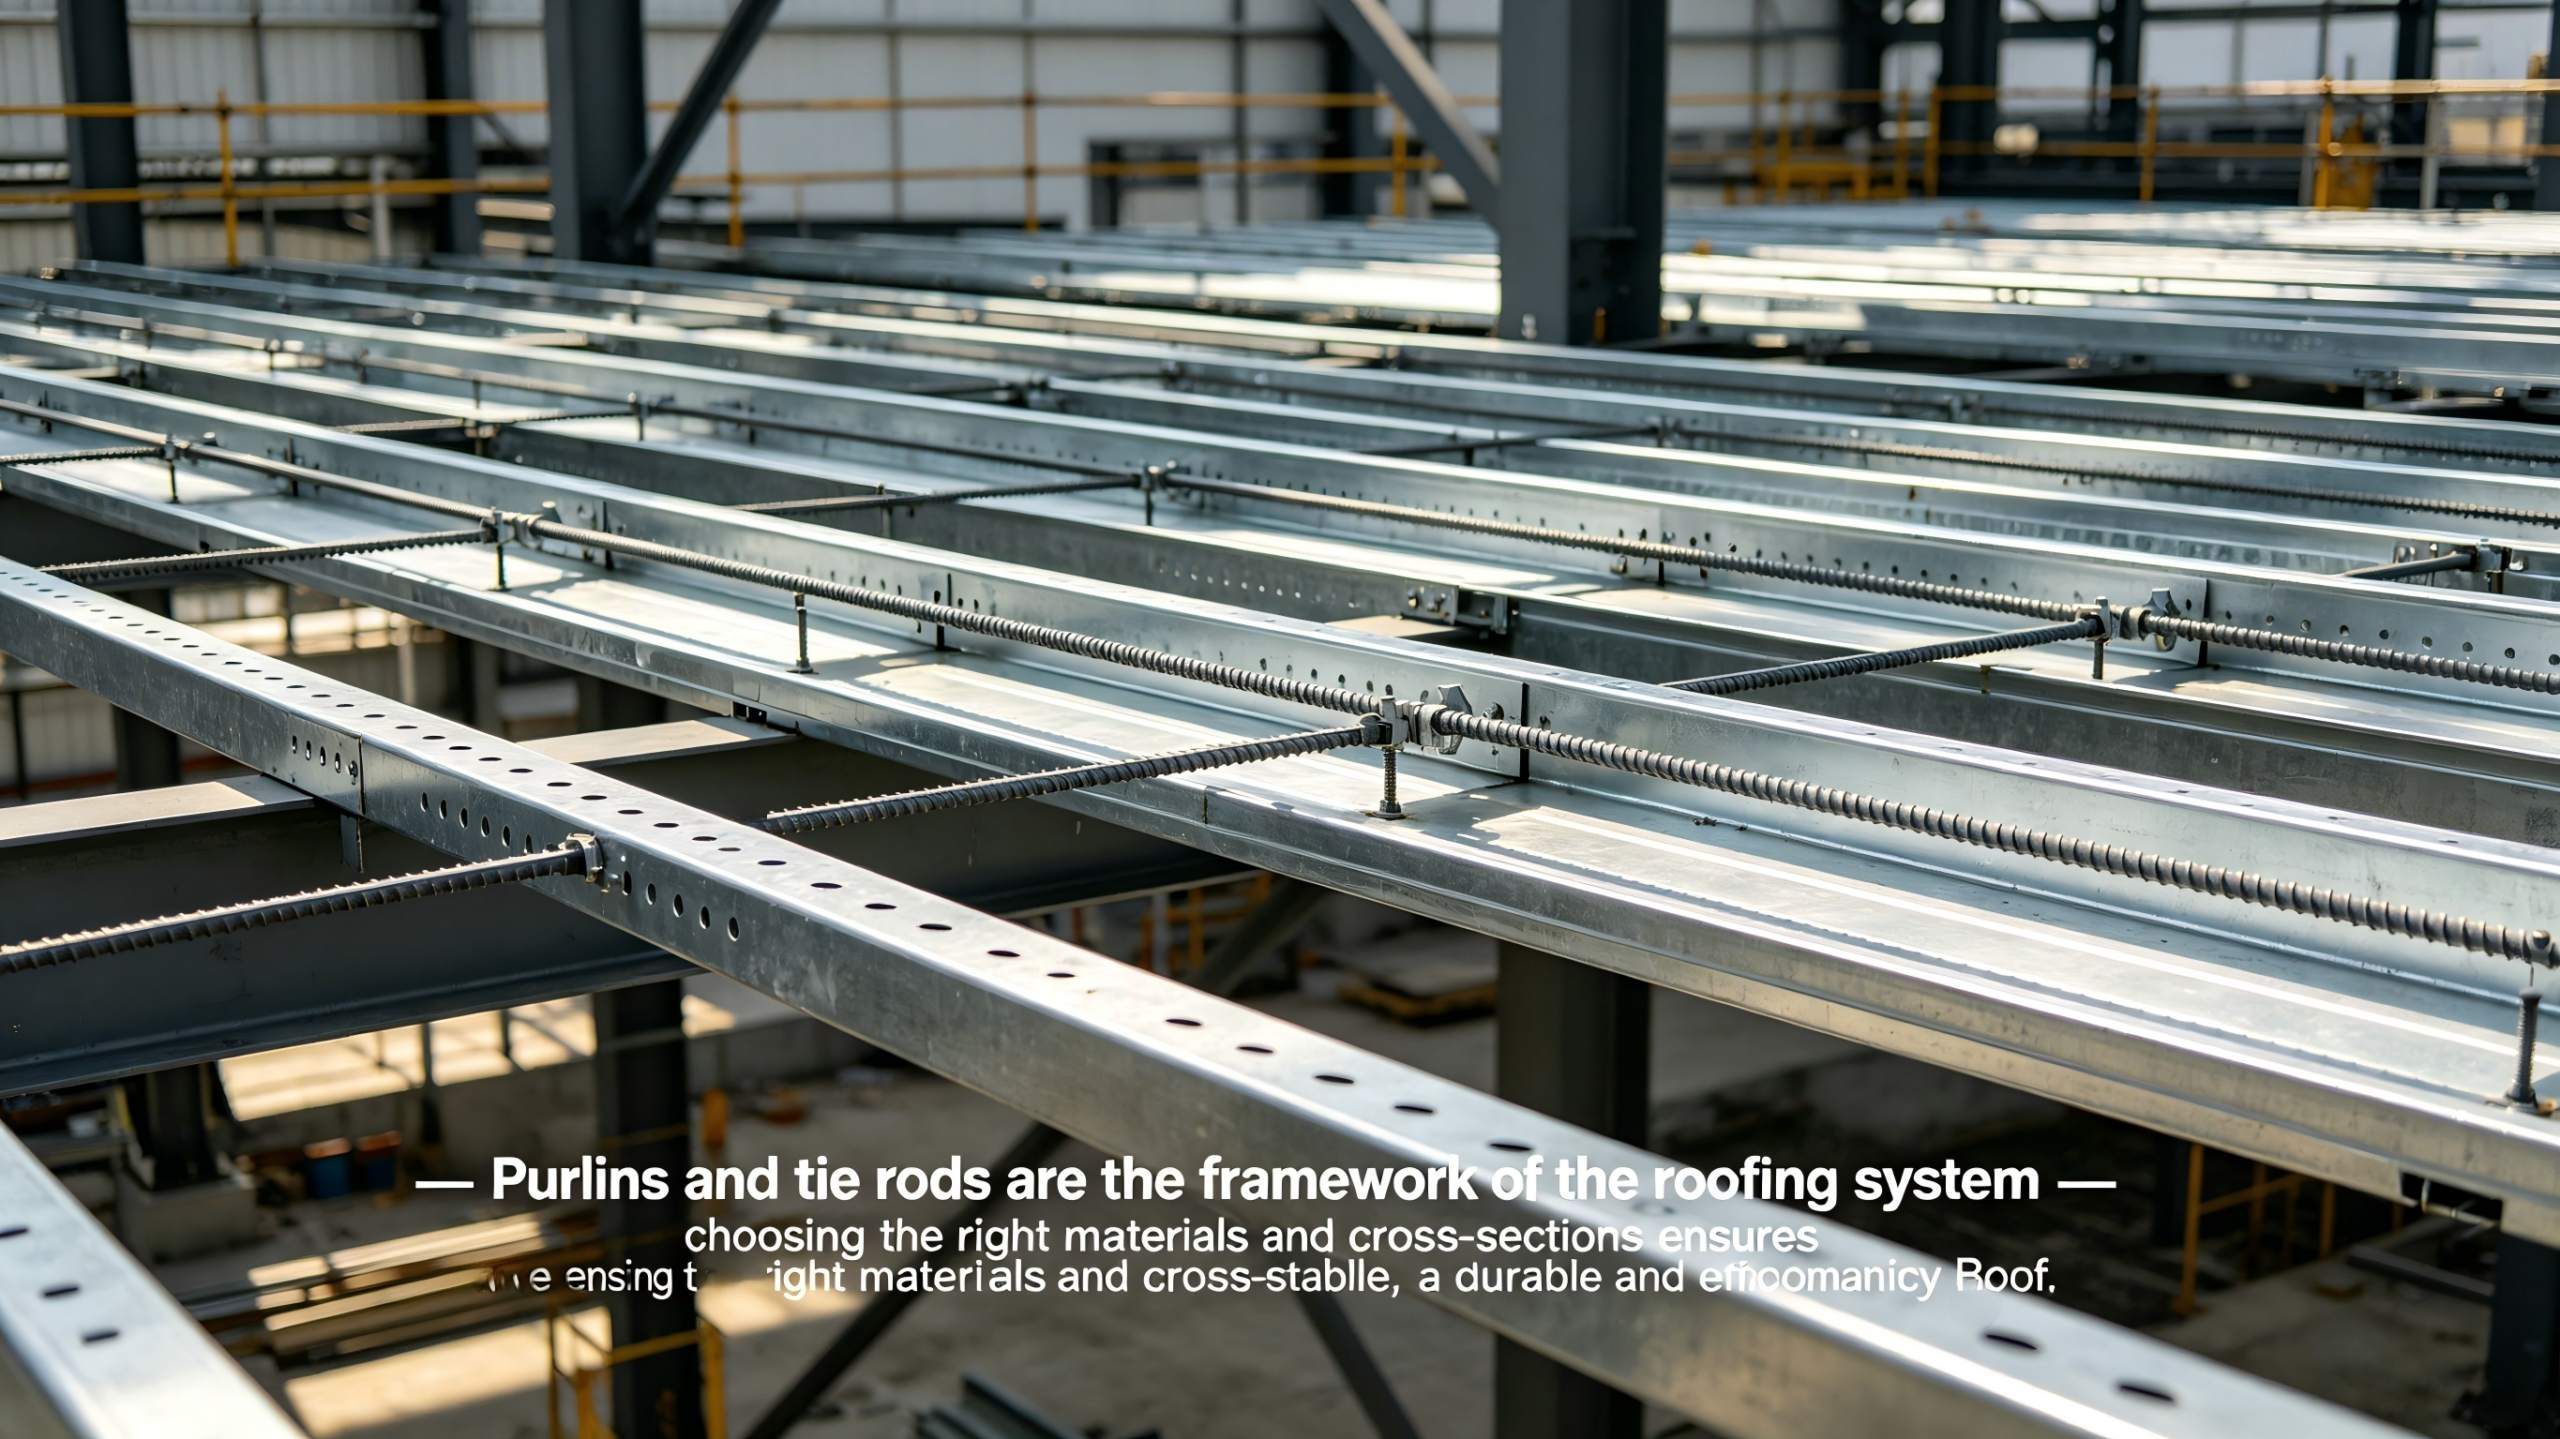
When designing a steel building, the main frame (columns and rafters) gets the most attention. But the secondary framing—purlins, girts, tie rods, and struts—often accounts for 20-30% of the total steel weight and is equally critical to structural integrity.
Purlins support the roof cladding and transfer wind and snow loads to the main frame. Tie rods and struts brace the purlins, preventing them from twisting or buckling under load. Getting these materials right means lower cost, faster installation, and a roof that won’t sag or fail.
For overseas clients sourcing steel structures for warehouses, factories, or agricultural buildings, understanding purlin and bracing material selection is essential.
This guide covers:
- C-section vs. Z-section purlins: when to use each.
- Material grades (Q235B, Q355B, G450/G550).
- Section sizing and span-load relationships.
- Tie rods and struts: functions, materials, and layout.
- Zinc coating classes by environment (ISO 12944 / AS 1397).
- Fasteners and connections for secondary framing.
1. What Are Purlins and Why Material Selection Matters
Purlins are horizontal cold-formed steel sections that span between main frames (rafters). They support the roof cladding and transfer loads (dead, live, snow, wind) to the primary structure.
| Component | Function | Typical Section |
|---|---|---|
| Roof purlin | Supports roof sheeting, resists downward (gravity) and upward (wind uplift) loads | C or Z cold-formed section |
| Wall girt | Supports wall cladding, resists wind loads | C cold-formed section |
| Tie rod (sag rod /拉条) | Tension-only bracing between purlins, prevents lateral-torsional buckling | 8-16mm round steel bar |
| Strut (撑杆) | Compression member that works with tie rods, transfers forces to main frame | Steel tube with internal tie rod |
Why secondary framing matters:
- Purlins are the direct connection to roof cladding—poorly selected purlins cause panel deformation, leaks, or collapse under snow load.
- Tie rods and struts prevent purlin rotation and twisting (lateral-torsional buckling), which is the most common failure mode for cold-formed sections.
- Secondary framing typically represents 15-25% of total structural steel cost—optimization yields significant savings -1.
2. Purlin Section Types: C-Section vs. Z-Section
Cold-formed purlins are manufactured by roll-forming galvanized steel coil into two primary shapes -1-4.
A. C-Section Purlin (C-shaped / Cee)
| Property | Description |
|---|---|
| Shape | 90-degree corners, straight flanges with lips (stiffeners) |
| Naming example | C200×75×20×2.0 (200mm depth, 75mm flange, 20mm lip, 2.0mm thickness) -1 |
| Connection behavior | Simple support (bolted at ends) |
| Typical span | 2-6 meters |
| Best for | Wall girts, low-slope roofs (<1:10), single-span conditions |
Why C-sections work:
- Simple to connect (bolts through web to frame).
- Effective for shorter spans and lower loads.
- Preferred for vertical wall applications.
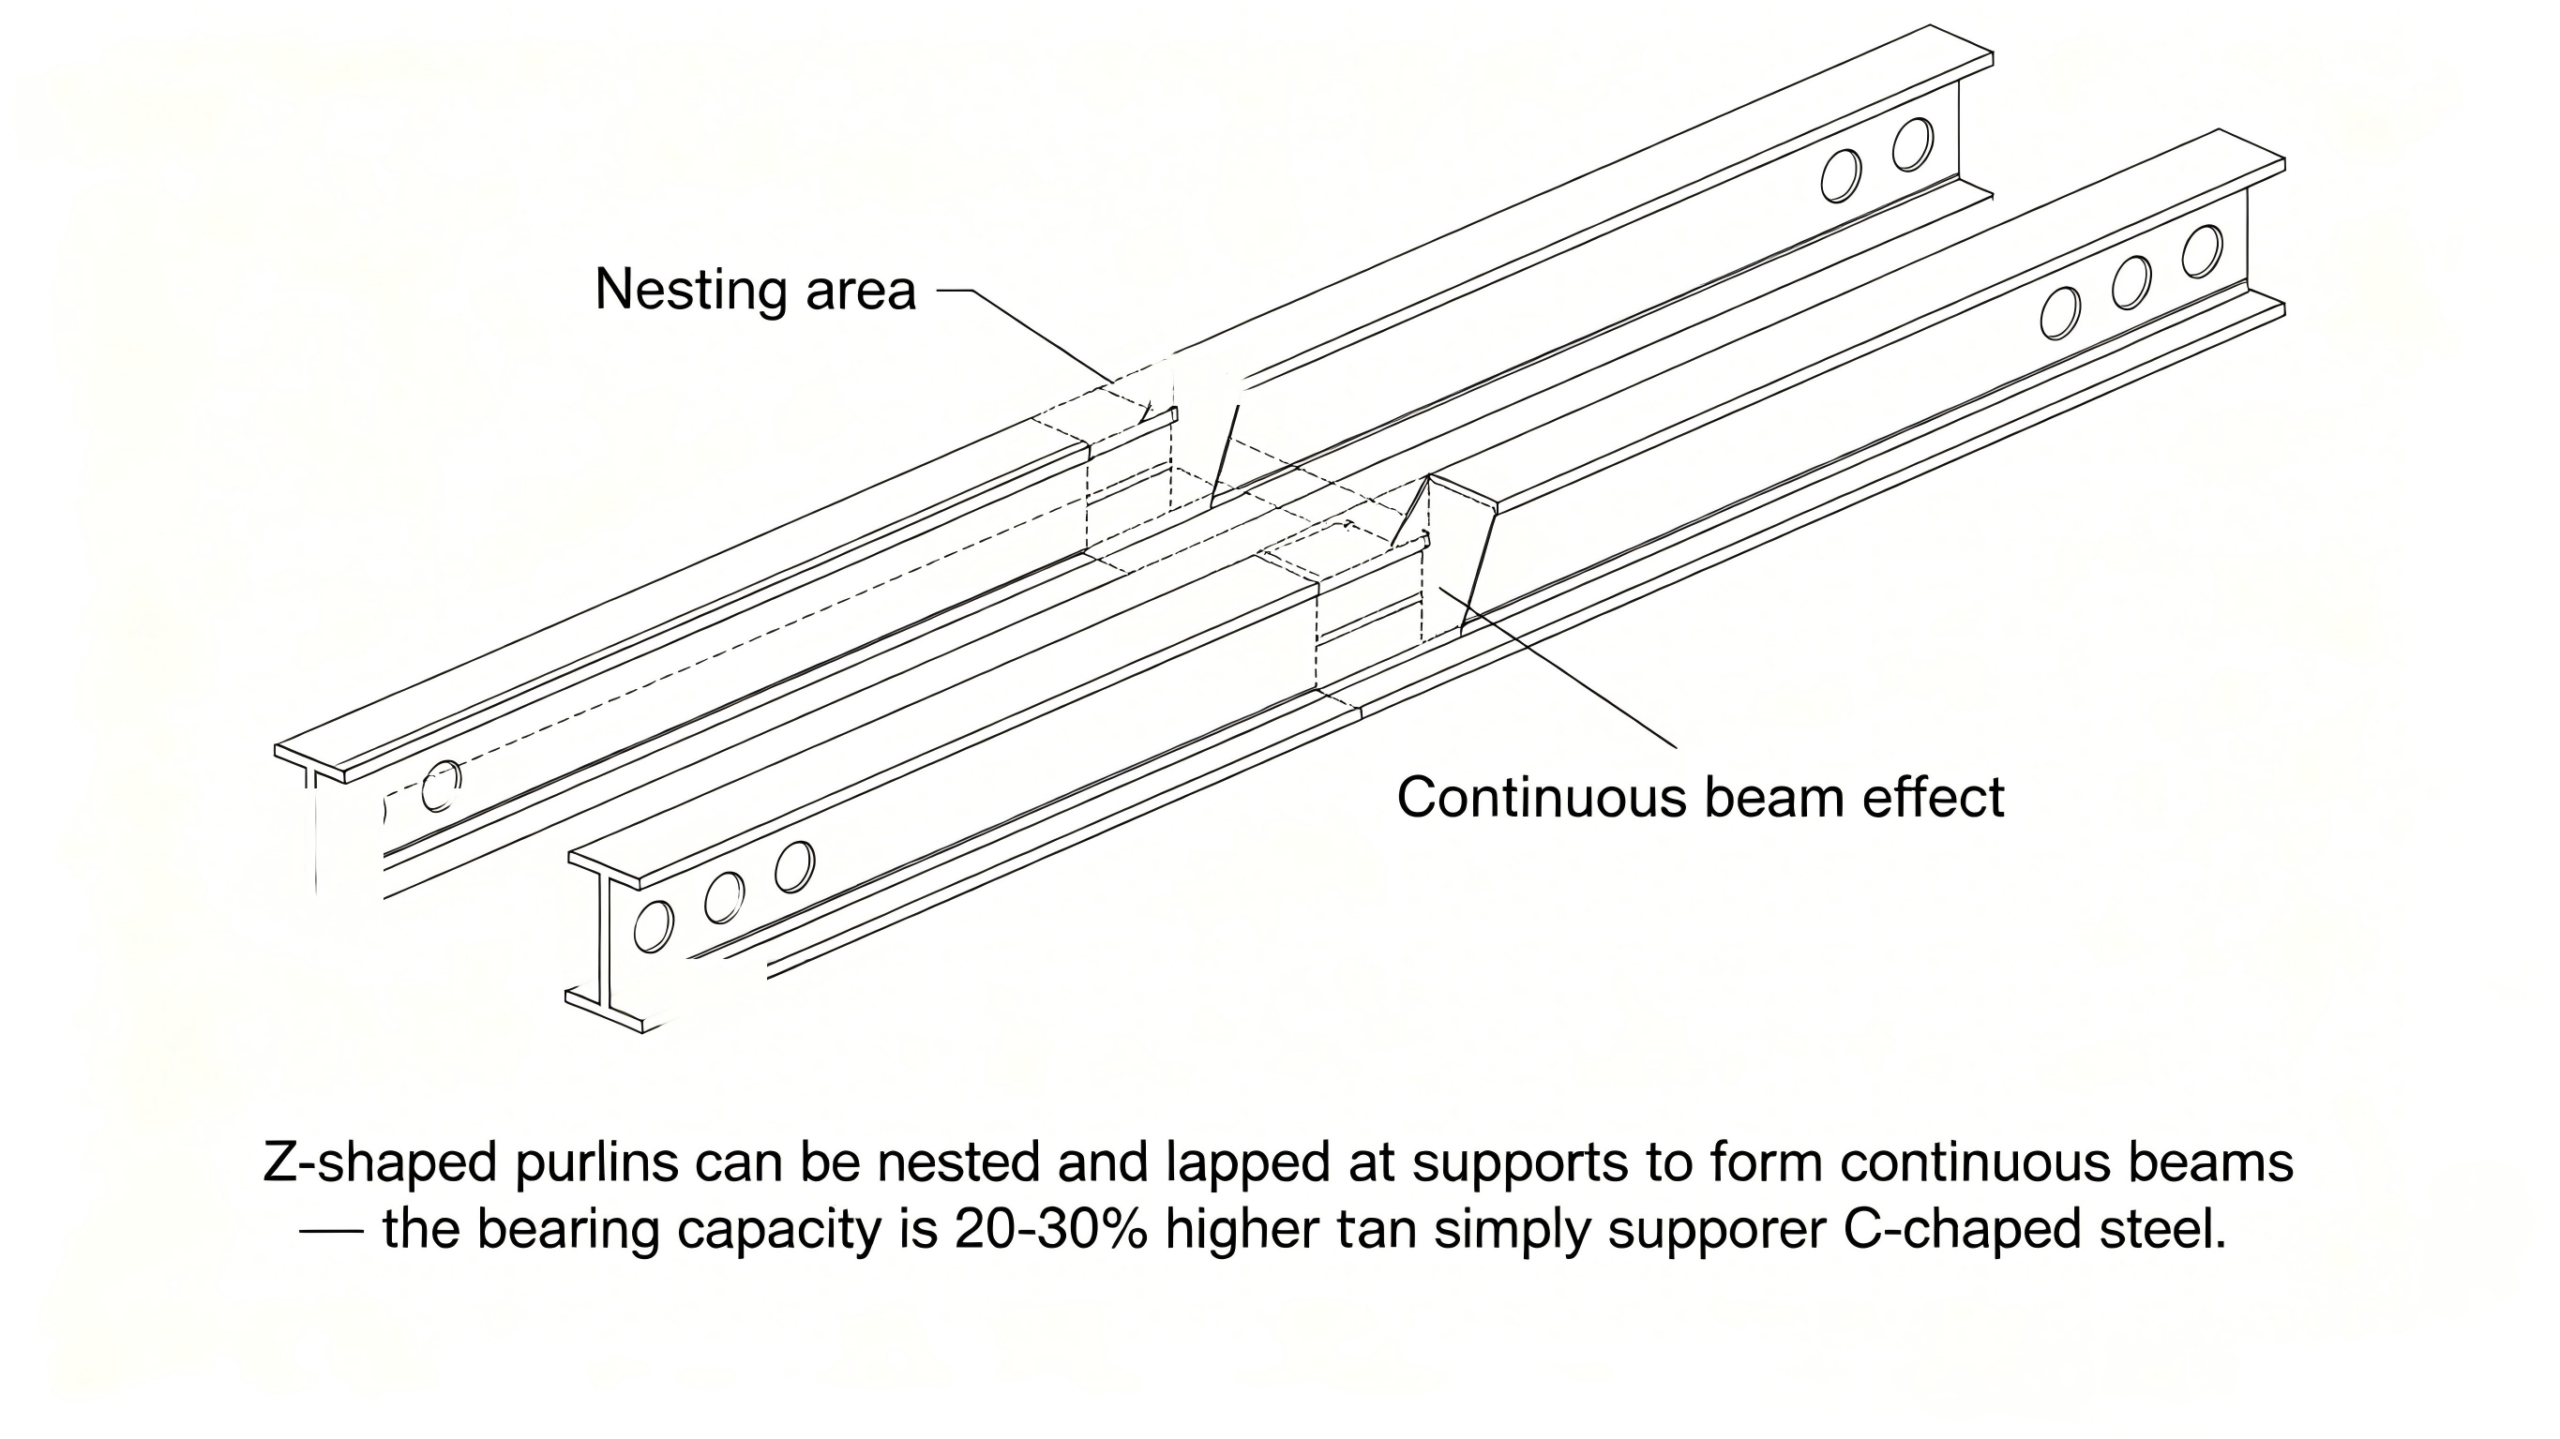
B. Z-Section Purlin (Z-shaped / Zed)
| Property | Description |
|---|---|
| Shape | Flanges angled at 60-75 degrees (not 90°) |
| Naming example | Z200×75×20×2.0 |
| Connection behavior | Continuous beam (nested overlaps at supports) -3 |
| Typical span | 4-9 meters |
| Best for | Medium to steep sloped roofs (>1:10), longer spans, continuous spans |
Why Z-sections perform better on sloped roofs:
- The angled flanges align with the roof slope, placing the strong axis perpendicular to the roof plane -3.
- Overlapping at supports creates a continuous beam effect—up to 20-30% higher capacity than simple-span C-sections of the same weight -3.
C. Selection Decision Matrix
| Roof Slope (angle) | Recommended Purlin | Why |
|---|---|---|
| <1:10 (flat / low slope) | C-section or Z-section (either works) | Slope not steep enough to favor Z |
| 1:10 to 3:10 | Z-section preferred | Z flange angle aligns with load direction |
| >3:10 (steep) | Z-section strongly recommended | Maximum structural efficiency -3 |
| Wall applications (vertical) | C-section | 90-degree flanges match vertical orientation |
| Multi-span (continuous over supports) | Z-section (nested overlap) | Creates continuous beam action -3 |
Expert guidance: According to Honglu Steel Group, “Z-shaped purlins with a large slope can fully utilize their bending resistance… For steel structure processing with roof slopes requiring continuous purlins, choose Z-shaped steel because the overlap of Z-shaped steel purlins is more convenient” -3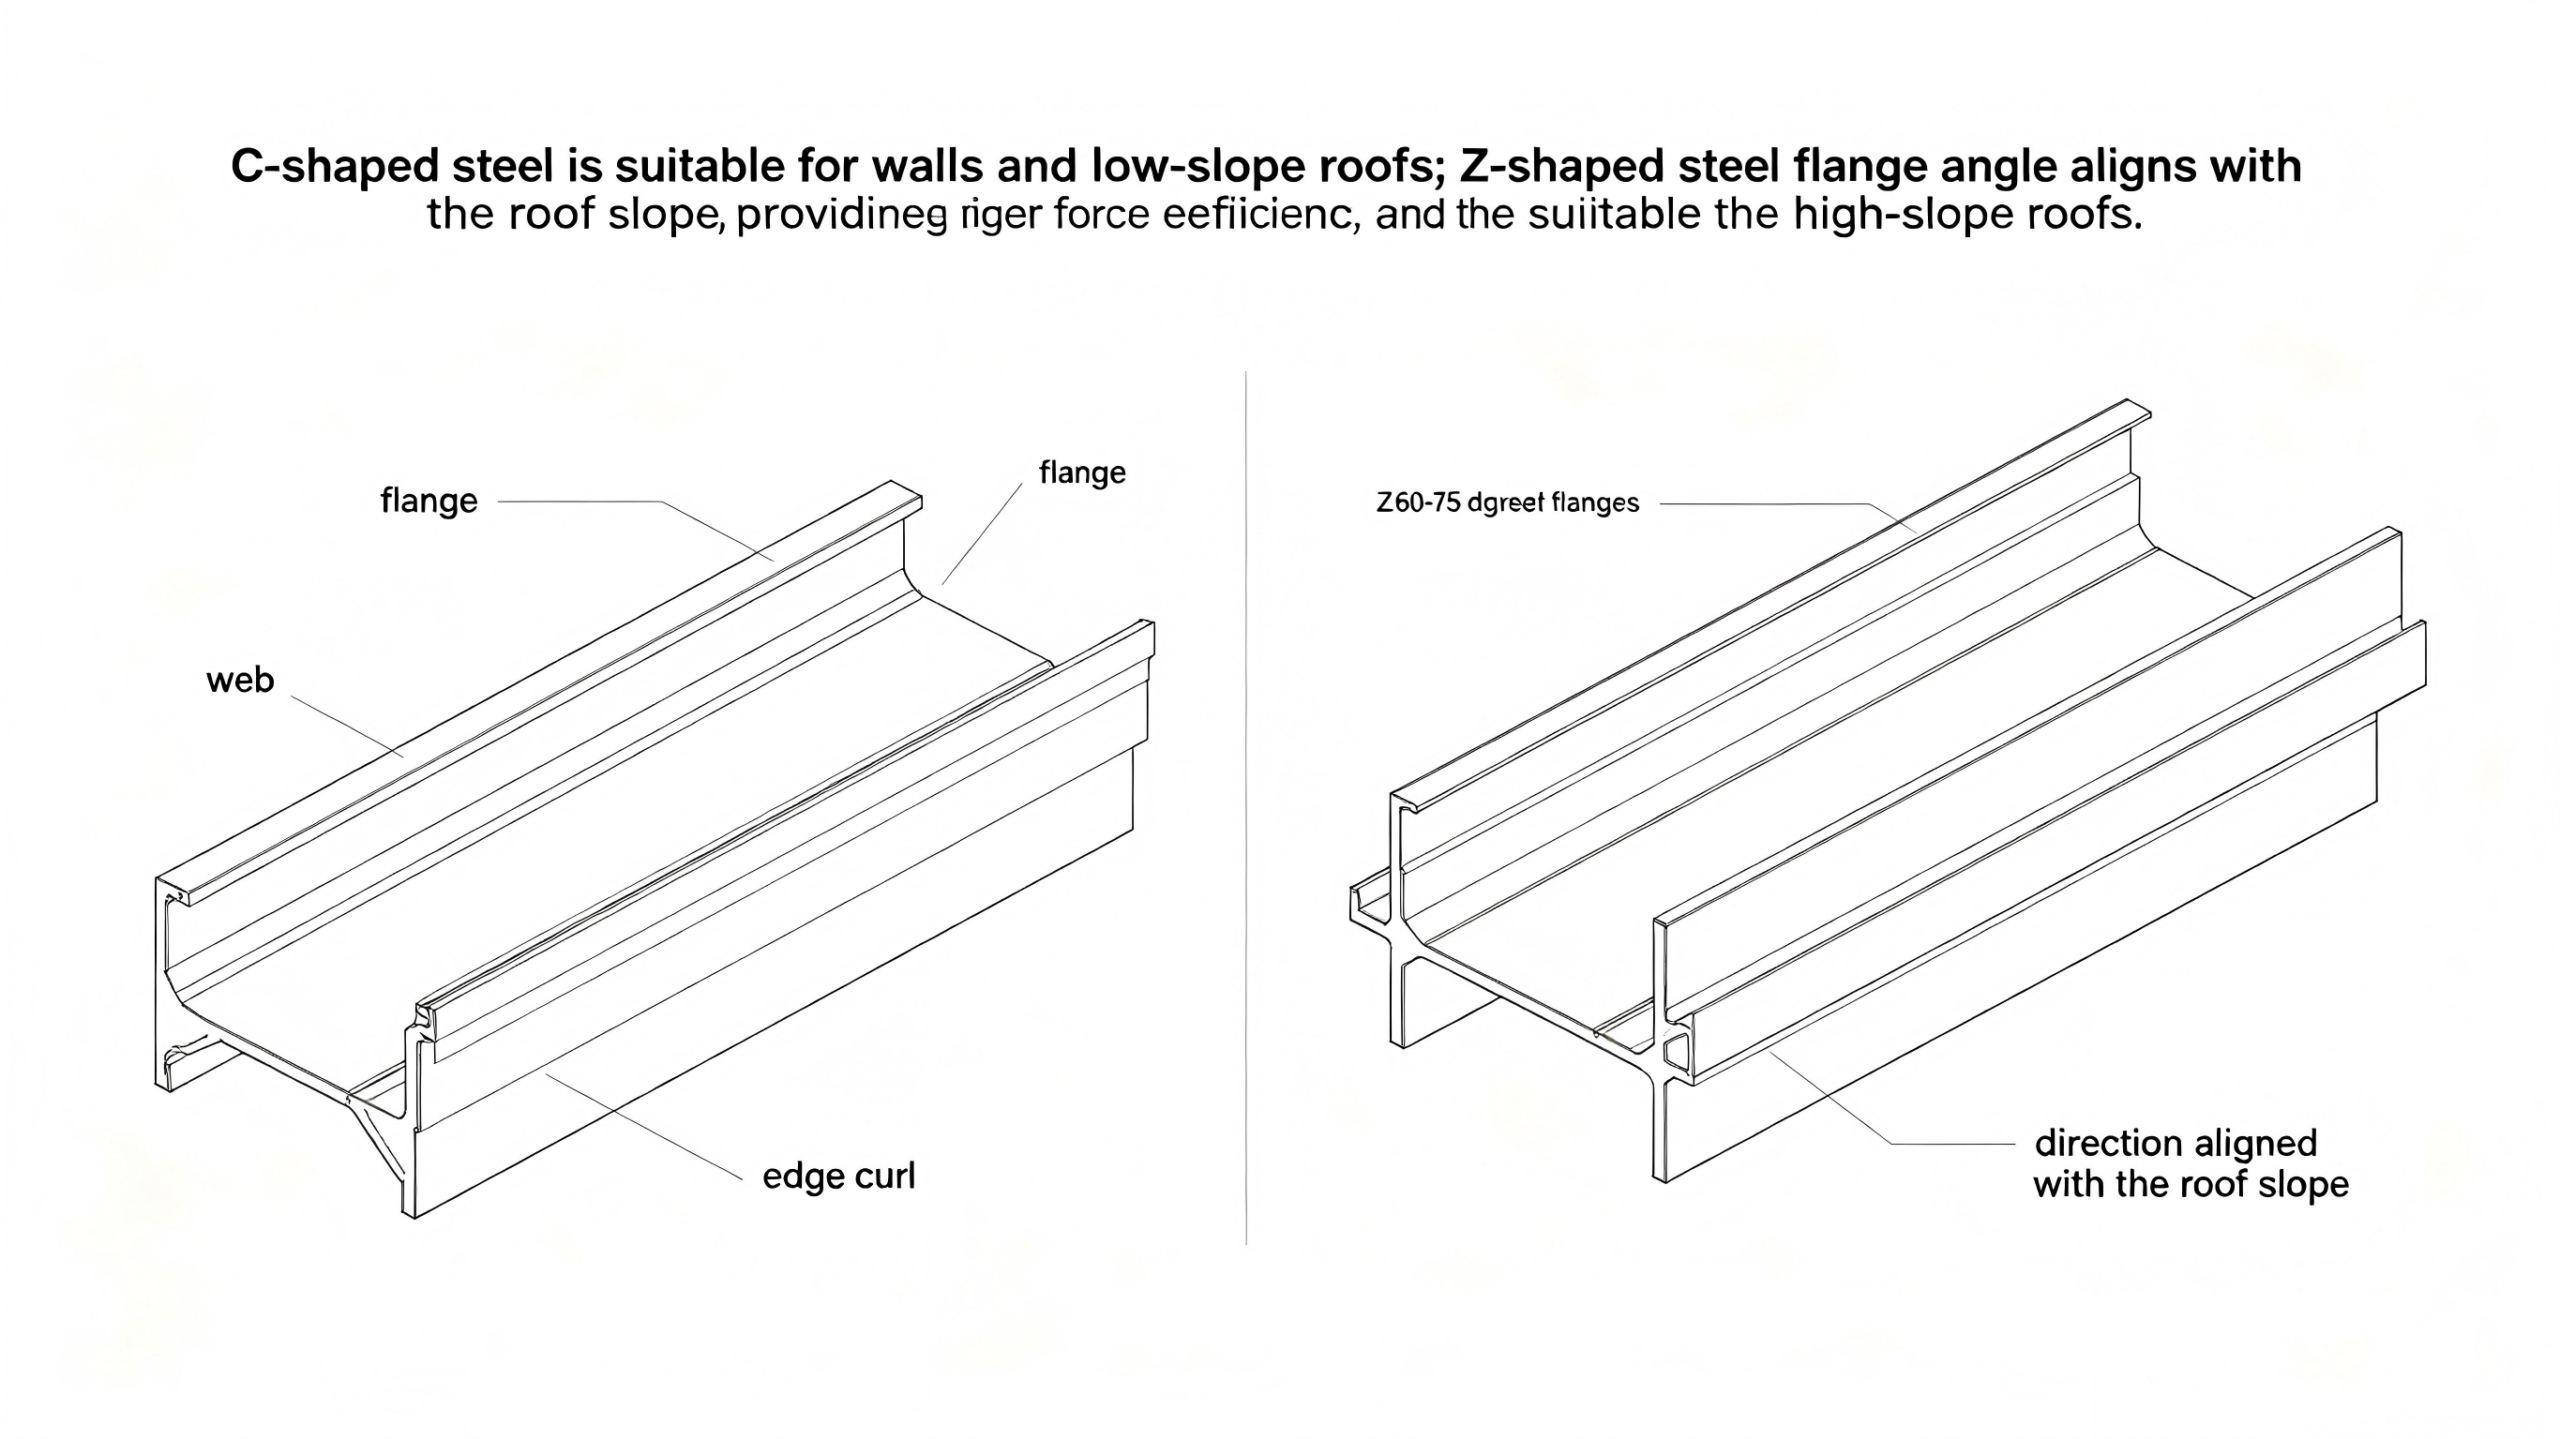
3. Purlin Material Grades & Mechanical Properties
Purlins are manufactured from hot-rolled steel coil that is cold-formed into shape. The cold-working process increases yield strength by 15-30% compared to the base material.
Common Material Grades
| Grade (EN/ASTM) | Min. Yield (MPa) | Typical Application | Cold-Formed Strength |
|---|---|---|---|
| Q235B (A36 equivalent) | 235 MPa | Light duty, short spans, non-structural | ~270-300 MPa |
| Q355B (A572 Gr50) | 355 MPa | Standard structural purlins, longer spans | ~400-430 MPa |
| G450 (AS 1397) | 450 MPa | High-strength purlins, heavy loads -8 | 450 MPa (as-formed) |
| G500 (AS 1397) | 500 MPa | Heavy industrial, long spans -8 | 500 MPa (as-formed) |
| G550 (AS 1397) | 550 MPa | Very high strength, specialized applications -8 | 550 MPa (as-formed) |
Source note: Australian standard purlins (AS 1397) use G450/G500/G550 designations. The number indicates minimum yield strength in MPa -8-9.
Section Naming Convention (Example: C200×75×20×2.0)
| Part | Value | Meaning |
|---|---|---|
| C | Section type | C-section (Z for Z-section) |
| 200 | Depth (mm) | Web height in millimeters |
| 75 | Flange width (mm) | Width of the top/bottom flange |
| 20 | Lip length (mm) | Stiffening lip at flange edge |
| 2.0 | Thickness (mm) | Base metal thickness -1 |
Typical thickness range: 1.2mm to 3.0mm -4-8
Section Depth vs. Span (Rough Guide)
| Purlin Depth (mm) | Typical Span (simple) | Typical Span (continuous) | Max Load (kPa) |
|---|---|---|---|
| 150 | 3.0-4.5m | 4.5-6.0m | 2.0-3.0 |
| 200 | 4.0-5.5m | 5.5-7.5m | 2.5-3.5 |
| 250 | 5.0-6.5m | 6.5-8.5m | 3.0-4.0 |
| 300 | 6.0-7.5m | 7.5-9.0m | 3.5-4.5 |
| 350 | 6.5-8.0m | 8.0-10.0m | 4.0-5.0 |
| 400 | 7.0-8.5m | 8.5-11.0m | 4.5-5.5 |
Values are approximate for G450 steel. Actual capacity depends on load, spacing, and bracing. -8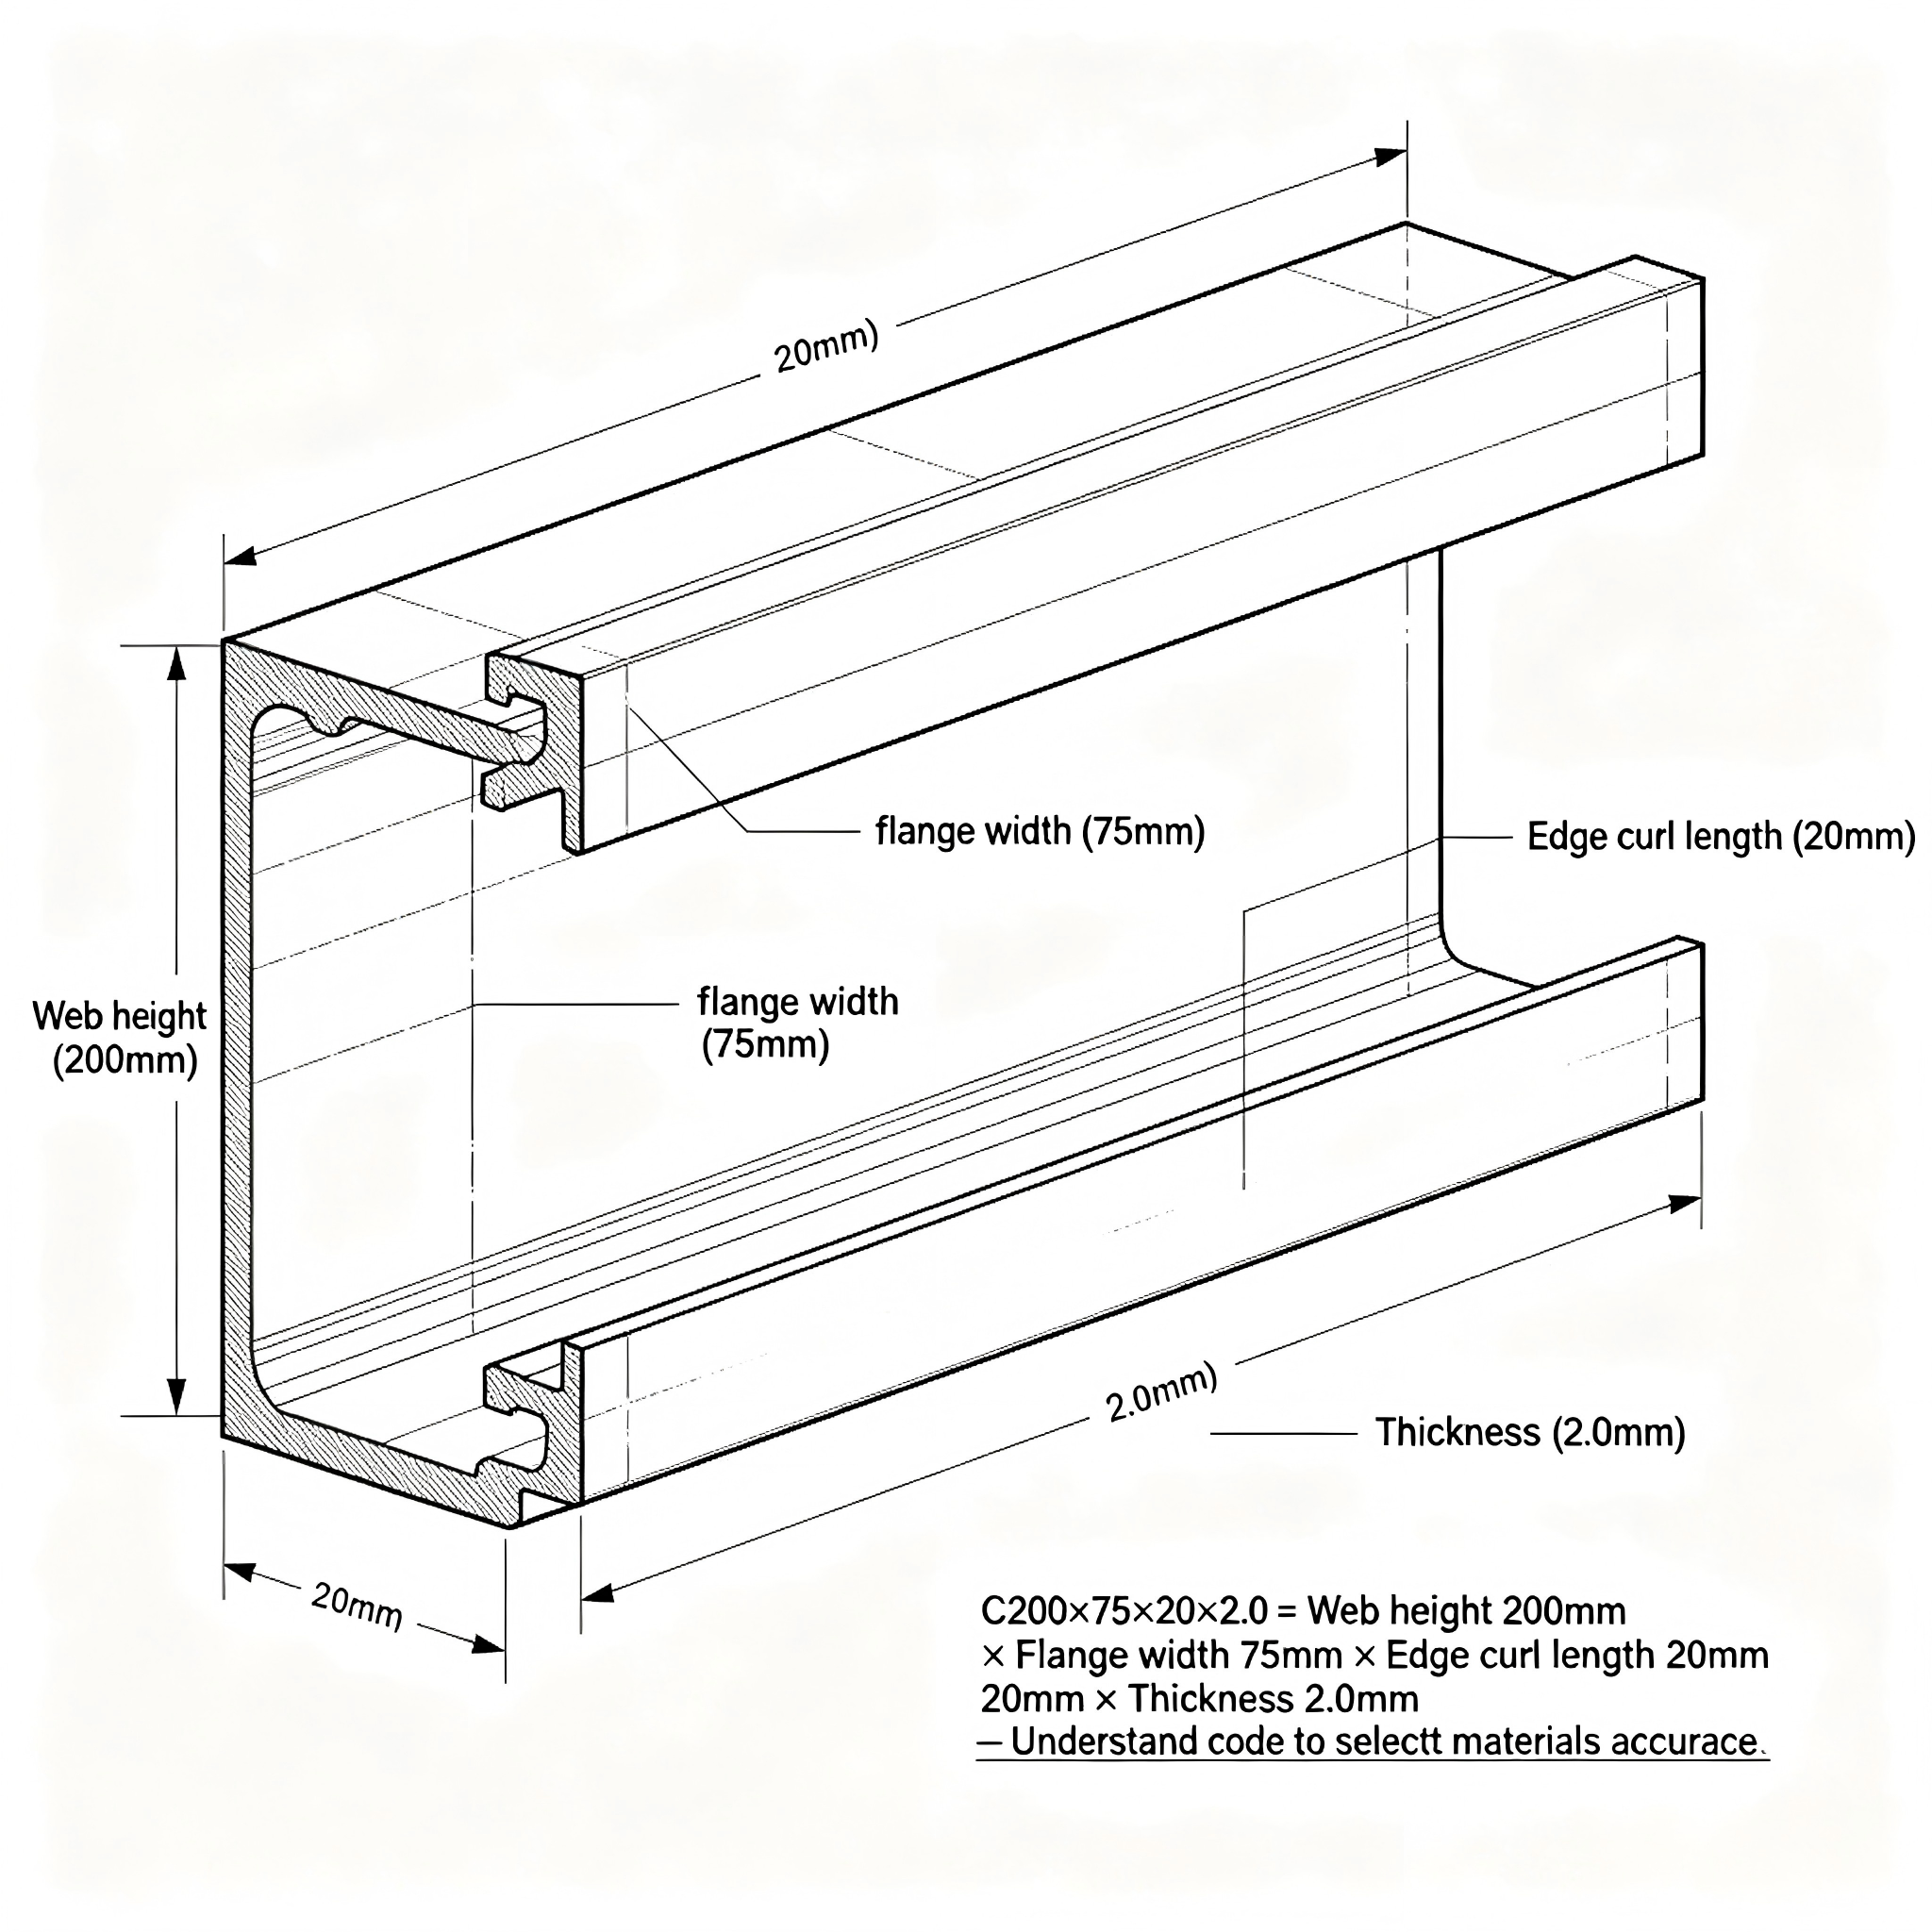
4. Tie Rods & Struts: The Critical Bracing System
Purlins alone are susceptible to lateral-torsional buckling—twisting under load. Tie rods and struts provide the necessary bracing.
Tie Rods (Sag Rods)
| Property | Specification |
|---|---|
| Function | Tension-only bracing between purlins. Resists purlin rotation and lateral displacement -2 |
| Material | Round steel bar (Q235B or Q355B) |
| Diameter range | 8mm to 16mm (typical: 12mm) |
| Thread type | Both ends threaded (M8-M16) |
| Installation | Passes through pre-punched holes in purlin webs, secured with nuts |
How tie rods work:
- Tie rods connect purlins in the plane of the roof slope (along the ridge-to-eave direction) -7.
- They only resist tension—they cannot push (compression would cause buckling).
- When the roof is loaded, tie rods prevent the purlin’s tension flange from moving laterally -2.
Struts
| Property | Specification |
|---|---|
| Function | Compression member that works with tie rods. Transfers forces from tie rods to the main frame -2 |
| Material | Steel tube (round or square) with internal tie rod |
| Construction | Tie rod passes through the tube; tube resists compression -2 |
| Location | Typically at ridge, eave, and at changes in tie rod direction |
Why struts are necessary:
- Tie rods can only pull. At the ridge and eave, the tie rod direction reverses—a strut converts the tension into compression that can be transferred to the main frame -7.
- Struts also provide rigid support where tie rods alone would be insufficient (e.g., at purlin splices or changes in roof slope).
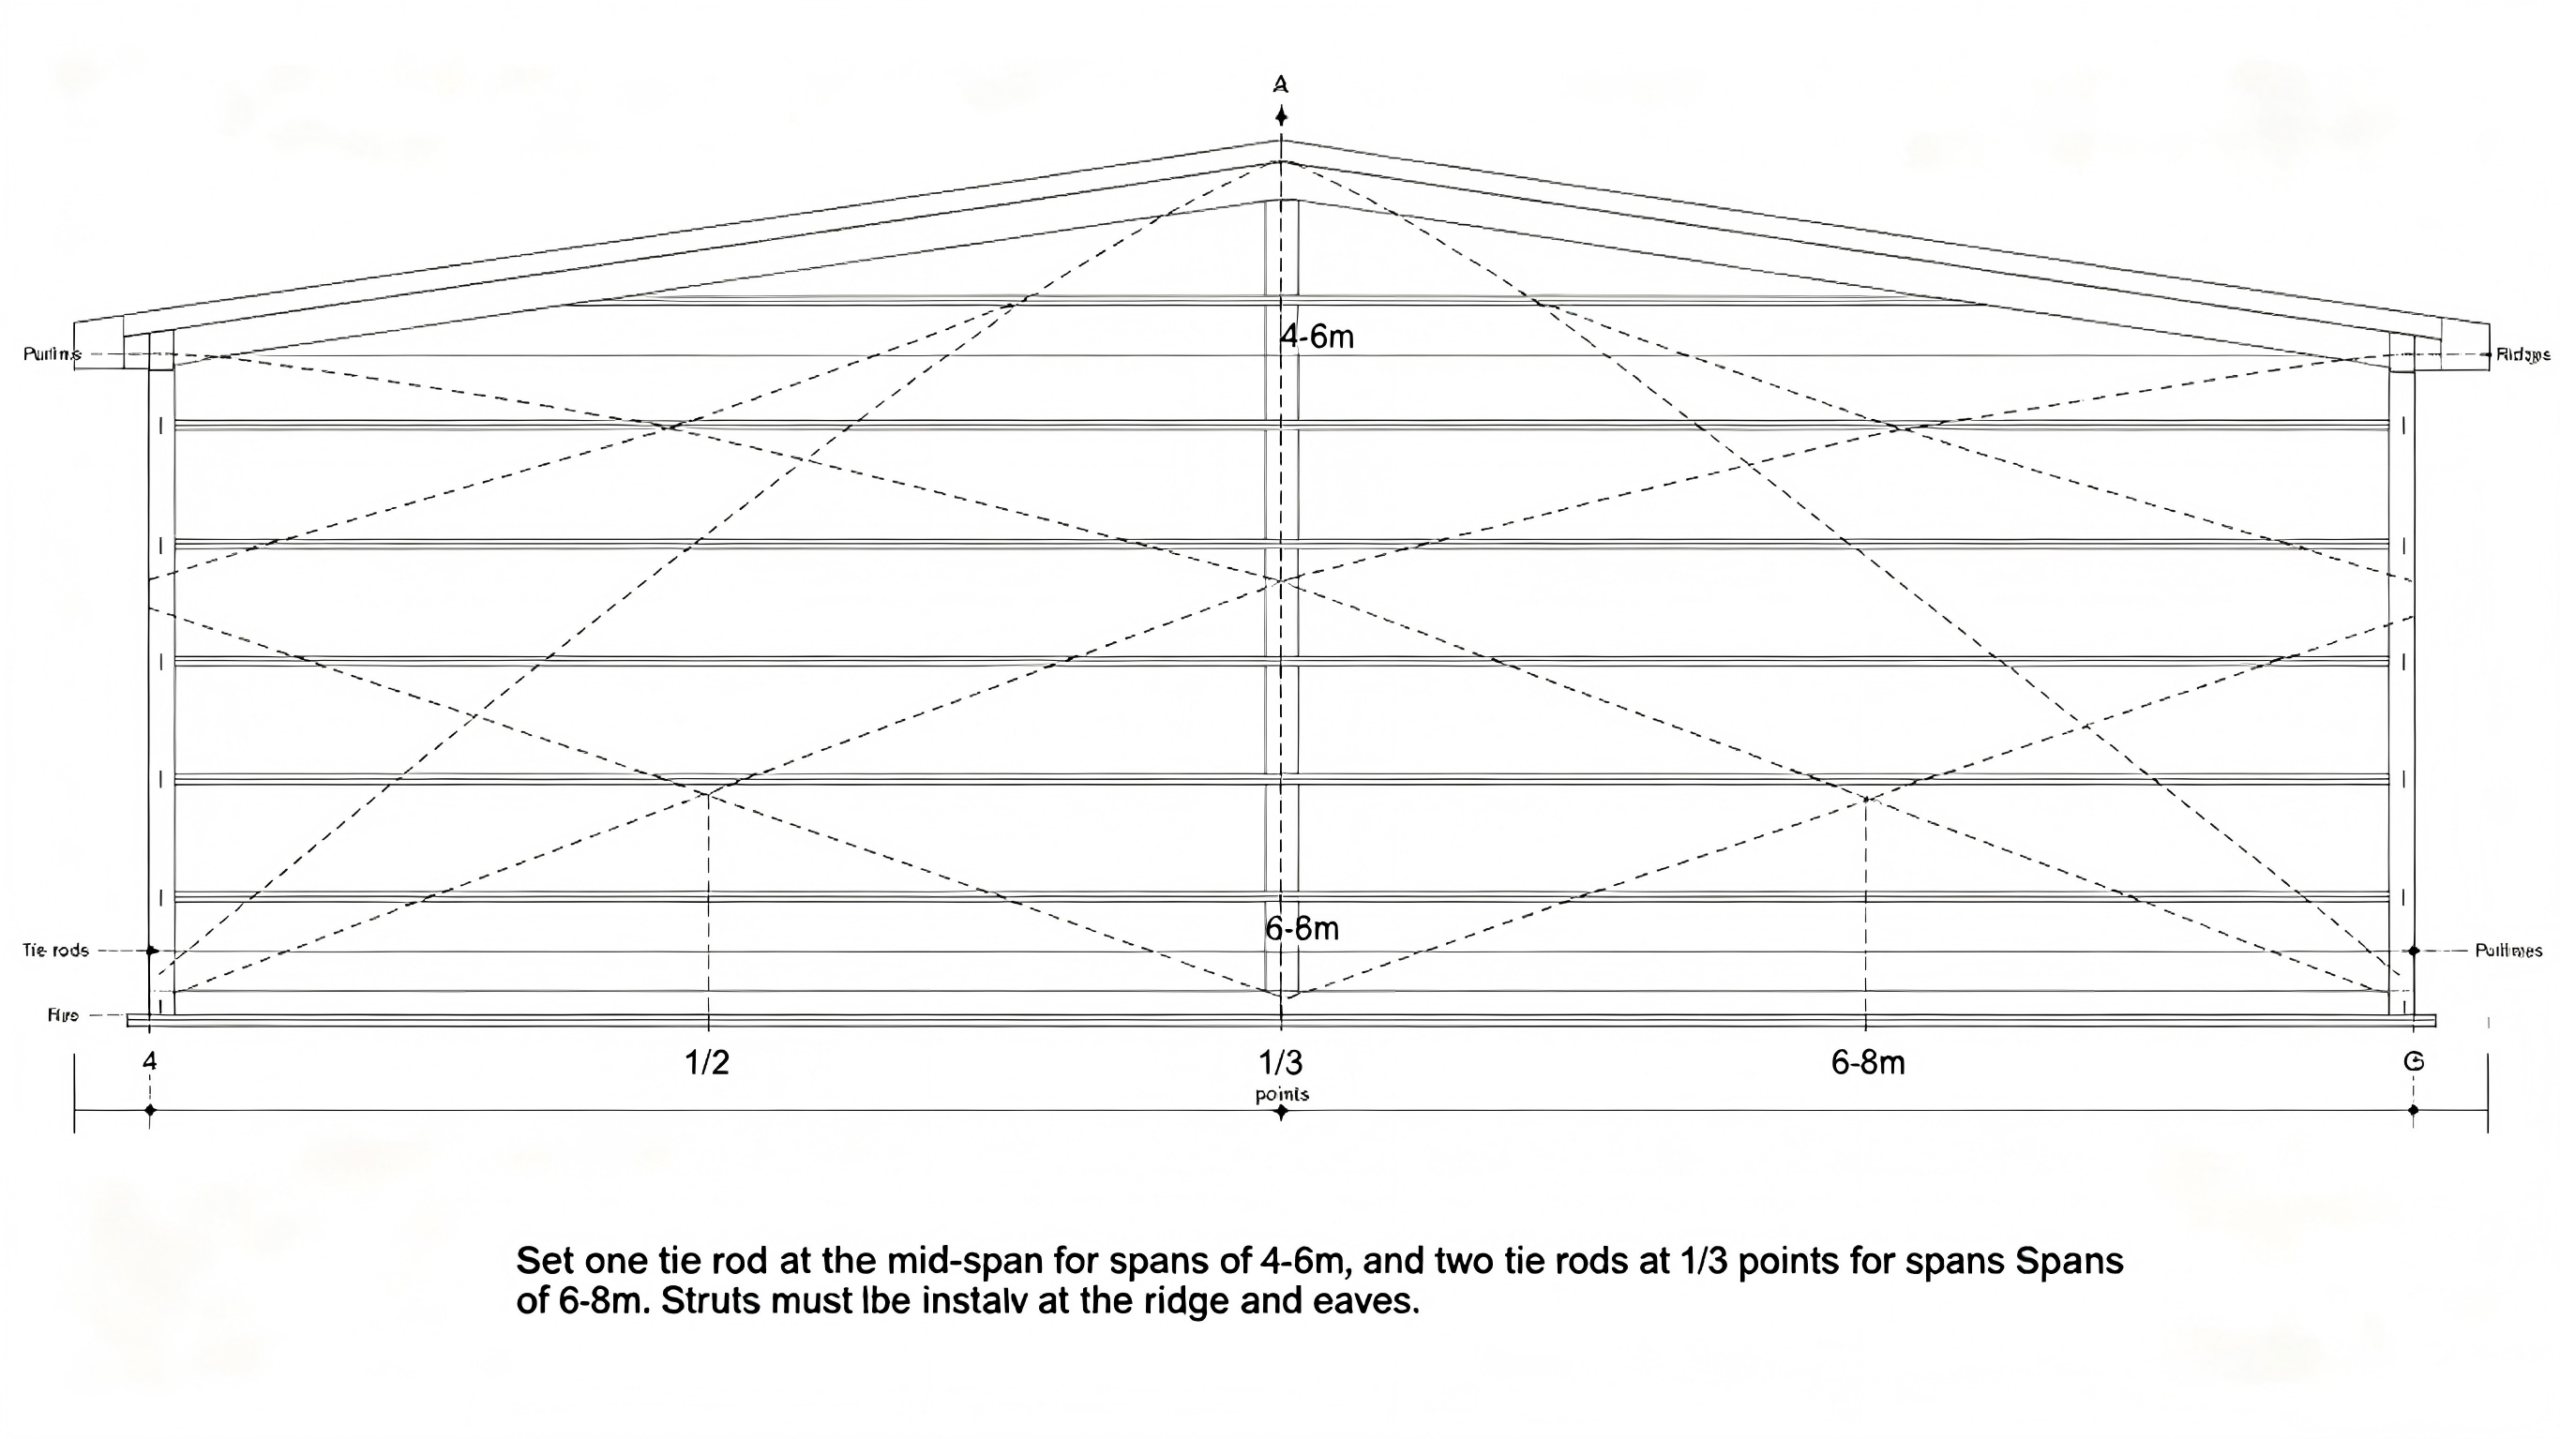
Bracing Layout Rules (Per GB 50018 / AS 1397)
| Purlin Span (L) | Bracing Requirement |
|---|---|
| L ≤ 4m | May not require bracing (check calculation) -7 |
| L > 4m or roof slope >1:10 | Minimum one row of tie rods at mid-span -7 |
| L > 6m | Two rows of tie rods (at 1/3 and 2/3 points) |
| L > 8m | Three rows or strut system |
| At ridge and eave | Struts required at tie rod termination points -7 |
| At purlin lap splices | Check if additional bracing is needed |
Typical bracing arrangement for a warehouse (6m purlin span, 1:15 slope):
- One row of tie rods at mid-span (3m from each end)
- Struts at ridge (both sides) and at eave (each side)
- Tie rods connected through pre-punched purlin holes
Installation detail: Tie rods should be positioned at approximately 1/3 of the purlin depth from the compression flange. For roofs where wind uplift causes stress reversal (compression in the bottom flange), double bracing (top and bottom) or crossed tie rods may be required -7.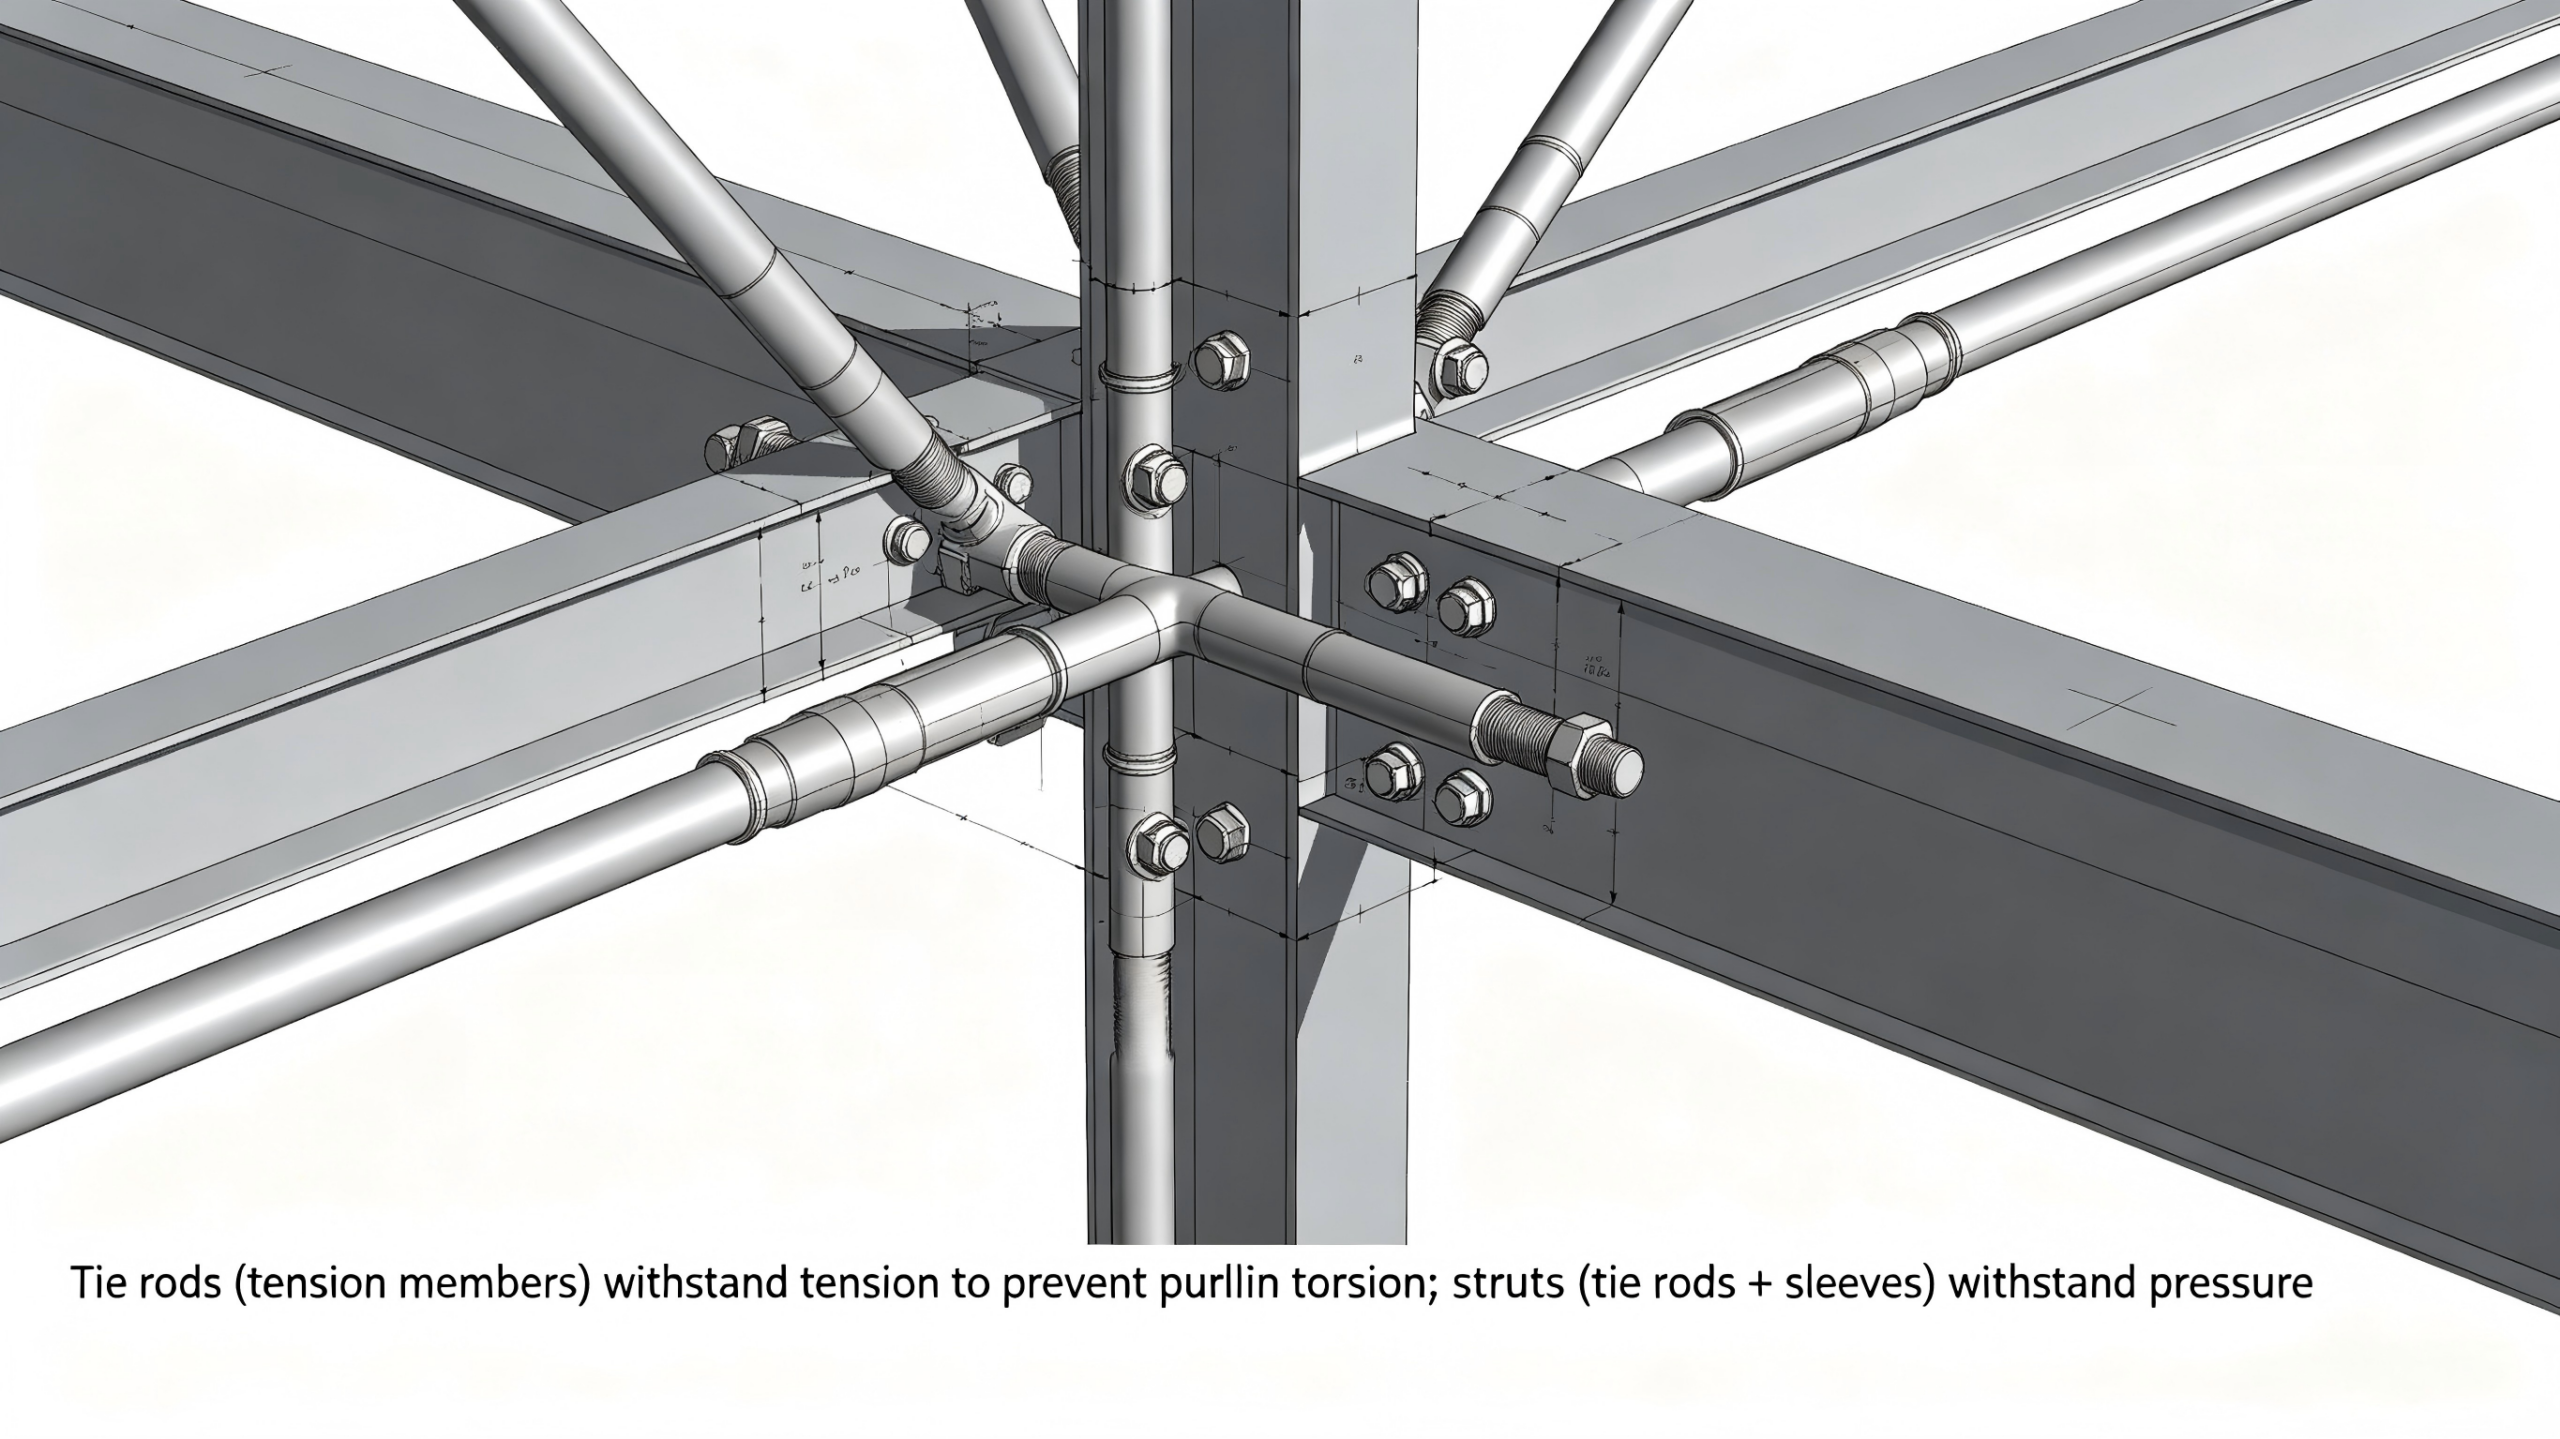
5. Corrosion Protection: Zinc Coating Classes
Purlins and bracing are typically galvanized (zinc-coated) because they are exposed to condensation, humidity, and (for open buildings) direct weather.
Coating Class Designations
| Coating Class | Minimum Coating Mass (g/m² both sides) | Coating Thickness (µm per side) | Best For |
|---|---|---|---|
| Z120 | 120g/m² | ~8-10µm | Interior, dry, enclosed |
| Z180 | 180g/m² | ~12-15µm | General interior, light industrial |
| Z275 | 275g/m² | ~20-25µm | Standard exterior, rural, mild industrial -1-4 |
| Z350 | 350g/m² | ~25-30µm | Marine/industrial up to 500m from coast -8 |
| Z450 | 450g/m² | ~32-38µm | Aggressive coastal, chemical, heavy industrial -8-9 |
| Z600 | 600g/m² | ~42-48µm | Extreme environments (splash zone, very aggressive) -4 |
Note: Coating mass is specified in grams per square meter (g/m²) total both sides. For example, Z275 = 275g of zinc per square meter of steel (combined both sides).
Environmental Selection Guide (per AS 1397 / ISO 12944) -9
| Building Environment | Exposure Description | Recommended Coating |
|---|---|---|
| Enclosed building | Non-aggressive, internal only | Z120-Z180 |
| Open-sided rural | Non-aggressive, occasional moisture | Z275 |
| Enclosed industrial | Non-aggressive internal (e.g., general warehouse) | Z275 |
| Open-sided industrial | Aggressive environment, contaminants | Z350-Z450 |
| Carports, awnings | Variable exposure, condensation | Z350 minimum |
| Coastal (>1km from surf) | Salt spray, high humidity | Z350-Z450 -9 |
| Coastal (<500m from surf) | High salt loading, aggressive | Z450 minimum |
| Intensive animal farming | Extremely aggressive (ammonia, moisture) | Z450 -9 |
| Fertilizer/cement storage | Very aggressive chemical exposure | Z450 + post-painting |
Important: According to BlueScope’s Technical Bulletin, “All surfaces of a building structure where natural rainfall cannot reach are subject to the buildup of dust, marine salts, industrial fallout or specific local environment contaminants” -9. Purlins in roof spaces often receive no natural washing, making proper coating selection critical.
For overseas clients: Specify the coating class based on your site’s environmental exposure, not just the building type. A warehouse 5km from the coast requires less protection than a similar building 200m from the coast.
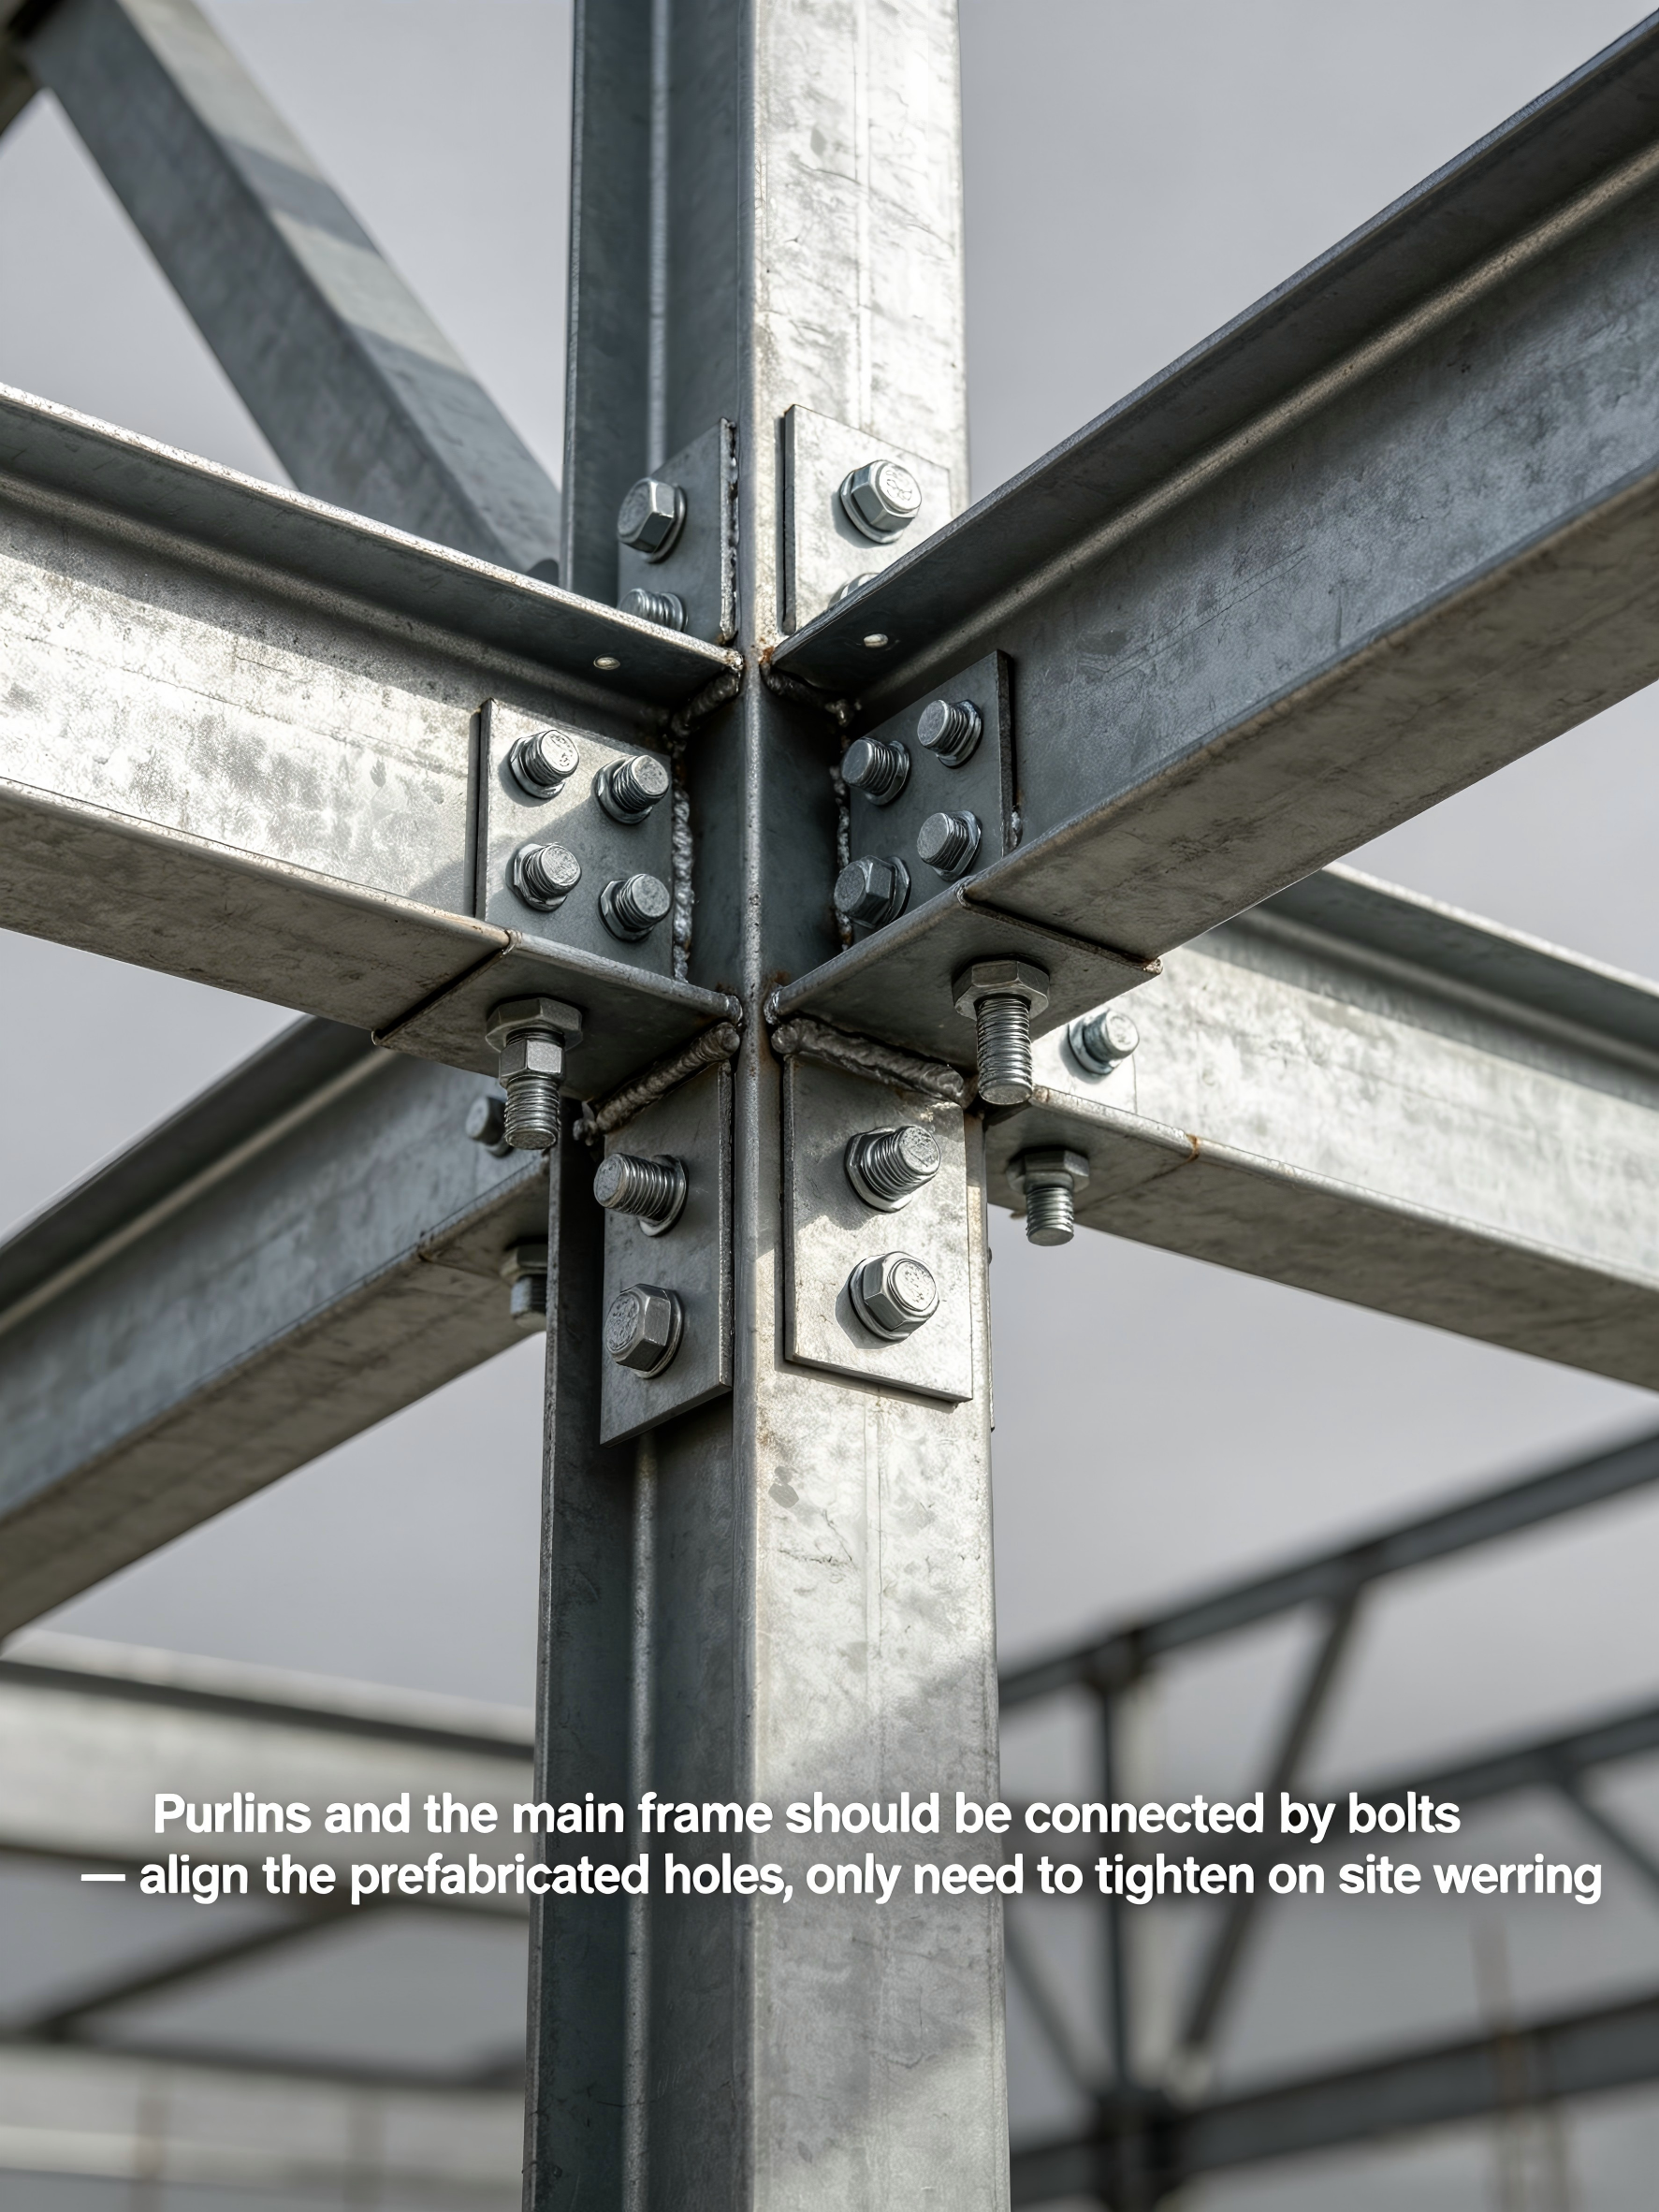
6. Pre-Punched Holes and Fabrication Details
Pre-punched holes in purlins reduce field installation labor and ensure consistent bracing alignment -4-8.
Standard Hole Patterns (Typical)
| Purlin Depth | Hole Type | Hole Size | Spacing (center-to-center) |
|---|---|---|---|
| 100-150mm | Round (web) | 14-18mm | 60-70mm from flange |
| 200mm | Round (web) | 18-22mm | 110mm from flange |
| 250mm | Round (web) | 18-22mm | 160mm from flange |
| 300mm | Round (web) | 22mm | 210mm from flange |
| 350mm | Round (web) | 22mm | 260mm from flange |
| 400mm | Round (web) | 22mm | 310mm from flange |
Reference: Metroll Megaspan purlin specifications -8
Benefits of pre-punched holes:
- Tie rods pass through purlin webs without field drilling
- Consistent alignment for bracing
- Faster installation (reduces labor cost)
- No risk of drilling through the wrong location
7. Load & Span Calculations (Practical Guidance)
Dead Loads
| Roofing Type | Dead Load (kN/m²) |
|---|---|
| Light gauge steel sheeting (0.42mm) | 0.05-0.07 |
| Standard steel sheeting + insulation | 0.10-0.15 |
| Heavy gauge sheeting + rigid insulation | 0.15-0.25 |
Live Loads
| Application | Live Load (kPa) |
|---|---|
| Accessible roof (maintenance only) | 0.5-1.0 |
| Non-accessible (standard warehouse) | 0.25-0.5 |
| Snow load (varies by region) | 0.5-5.0+ |
| Wind uplift (varies by region) | 0.5-3.0+ |
Purlin Spacing
| Roofing Type | Typical Purlin Spacing |
|---|---|
| Light steel sheeting (0.42mm) | 1.0-1.5m |
| Standard steel sheeting (0.5mm) | 1.2-1.8m |
| Heavy gauge/composite panels | 1.5-2.5m |
Rule of thumb: Purlin spacing is typically 1.2-1.8m for standard industrial steel sheeting. Wider spacing requires heavier gauge sheeting or purlins.
Span-Load-Section Relationship (G450 steel, 1.5m spacing, 1.5kPa load)
| Required Span | Minimum Section | Thickness |
|---|---|---|
| 4.0m | C150 or Z150 | 1.5mm |
| 5.0m | C200 or Z200 | 1.5mm |
| 6.0m | Z200 or Z250 | 1.9mm |
| 7.0m | Z250 or Z300 | 1.9mm |
| 8.0m | Z300 | 2.4mm |
| 9.0m | Z350 | 2.4mm |
*For continuous Z-sections (nested overlap), spans can be 15-25% longer than simple-span C-sections of the same size* -3.
8. Selection by Project Type
| Project Type | Recommended Purlin | Grade | Coating | Tie Rods | Notes |
|---|---|---|---|---|---|
| Small warehouse (dry climate) | C-section | Q235B | Z180 | 12mm bar (1 row at mid-span) | Economy option |
| Standard warehouse (temperate) | Z-section | Q355B | Z275 | 12mm bar (1-2 rows) | Most common |
| Large industrial building | Z-section | G450 | Z350 | 12-14mm bar + struts | Continuous spans, heavy loads |
| Cold storage / freezer | Z-section | Q355B | Z350+ | 12mm bar + struts | Condensation risk, higher coating |
| Coastal building (<1km) | Z-section | G450 | Z450 | Stainless 304 tie rods | High salt exposure |
| Agricultural (livestock) | Z-section | Q355B | Z450 | 12-14mm bar | Ammonia accelerates corrosion |
| Chemical / fertilizer storage | C or Z | G450 | Z450 + post-paint | Stainless tie rods | Very aggressive |
| Wall girts | C-section | Q235B/Q355B | Per environment | May not require tie rods | Vertical orientation |
9. Fasteners & Connections
Purlin-to-Frame Connections
| Connection Type | Fastener | Typical Quantity |
|---|---|---|
| Bolted through web | M12-M16 bolt with washer | 2 bolts per connection (top and bottom of web) |
| Welded (field) | Not recommended for prefab | – |
Preferred method: Bolted connections (no field welding). Pre-punched holes in purlin flanges align with holes in frame brackets.
Tie Rod Connections
| Component | Fastener | Torque (typical) |
|---|---|---|
| Tie rod to purlin | Nut (grade 6 or 8) | Snug plus 1/4 turn |
| Tie rod to strut | Nut at each end | Snug plus 1/4 turn |
| Strut to frame | Welded or bolted | N/A |
Installation sequence:
- Erect main frames and primary purlins
- Insert tie rods through pre-punched holes
- Install struts at ridge, eave, and intermediate points
- Tighten nuts (do not over-torque—tie rods should be straight but not under high tension)
- Install roofing over purlins
10. Quality Control & Inspection Checklist
Before accepting purlin and bracing materials, verify:
Material verification:
- Mill certificate confirms specified grade (Q235B, Q355B, G450, etc.)
- Coating class matches specification (Z275, Z350, Z450, etc.)
- Thickness measured (allow ±0.1mm tolerance)
- Dimensions match shop drawings (depth, flange width, lip length)
Fabrication verification:
- Pre-punched holes align with tie rod layout
- Holes free of burrs (burrs damage tie rod threads)
- Galvanized coating intact (no bare spots)
- Cut ends are clean (no excessive burrs)
Installation verification (field):
- Purlin laps are properly nested (for Z-sections)
- Tie rods pass straight through holes (no binding)
- Nuts are snug but not over-tightened
- Struts are vertical (plumb) and securely attached
11. Common Failures & Prevention
| Failure | Cause | Prevention |
|---|---|---|
| Purlin twist (lateral-torsional buckling) | Insufficient tie rods | Follow bracing rules: 1 row at 4-6m spans, 2 rows at 6-8m spans -7 |
| Purlin sag (excessive deflection) | Under-sized section or span too long | Use deeper section, reduce spacing, or specify continuous Z-section |
| Corrosion at purlin ends | Water trapped between purlin and frame | Specify drainage holes, sloped surfaces, or higher coating class |
| Tie rod thread stripping | Low-grade tie rod or over-torquing | Use Q355B tie rods, torque to snug only |
| Purlin flange buckling (local) | Thickness insufficient for load | Increase thickness or reduce spacing |
| Roof panel oil-canning | Purlin spacing too wide | Reduce purlin spacing to ≤1.5m for standard sheeting |
12. Link to Steel Roofing Component Customization Service
We supply complete secondary framing systems—engineered, fabricated, and coated for your specific environment.
Our secondary framing services include:
- Purlin roll-forming: C and Z sections. Depths 100-400mm. Thickness 1.2-3.0mm. Cut to exact length.
- Material grades: Q235B, Q355B (GB/T), G450/G550 (ASTM/AS equivalent). Full mill certificates.
- Zinc coating: Z180 to Z450 (standard). Z600 available for extreme environments. Pre-punched holes per your layout.
- Bracing components: Tie rods (8-16mm diameter, threaded both ends), struts (tube + internal tie rod), connection brackets.
- Fasteners: Bolts, nuts, washers (galvanized or stainless).
- Prefabrication: Pre-punched holes to match your bolt-up drawings. End cuts and notches as required.
For overseas clients:
We can supply pre-punched purlins with tie rods and struts pre-packaged by bay. Each bay’s components are labeled with the frame bay number. Installation drawings show exact tie rod locations and torque specifications.
👉 [Request a roofing component quote]
Send us your building dimensions, roof slope, design loads (snow/wind), and environmental exposure (coastal/industrial/rural). We will return purlin sizing, bracing layout, coating recommendation, and budget price within 48 hours.
Summary Table: Quick Purlin Selection Reference
| Your Condition | Purlin Type | Grade | Coating | Tie Rods |
|---|---|---|---|---|
| Span <4m, light load | C-section | Q235B | Z180 | Optional |
| Span 4-6m, standard | Z-section | Q355B | Z275 | 1 row (mid-span) |
| Span 6-8m, heavy load | Z-section (continuous) | G450 | Z275-Z350 | 2 rows (1/3 points) |
| Span >8m | Z-section (continuous) | G450/G550 | Z350+ | Strut system |
| Coastal (0.5-2km) | Z-section | G450 | Z350-Z450 | 12-14mm bar |
| Coastal (<500m) | Z-section | G450 | Z450-Z600 | Stainless tie rods |
| Agricultural (animal) | Z-section | Q355B | Z450 | 12-14mm bar |
| Wall girt (vertical) | C-section | Q235B/Q355B | Per environment | None typically |
- Prefab Warehouse Product
- Hot-Rolled Steel Framing Guide
- Cold Climate Steel Selection
- Welding Consumable Selection
- Contact The Engineering Team
Use these linked guides to compare material grades, secondary framing, welding quality, and warehouse procurement requirements before requesting a project quotation.